Home saunas are an amazing addition to any home, but what does one cost? Learn…

Home Sauna Installation: 7 Mistakes to Avoid Pre-Install
Dodge common pitfalls—from poor measurements to inadequate support—to save time and money.
Thinking about adding a sauna to your home? Smart move! There’s nothing quite like the warm waters of your very own sauna after a long day. But before you start planning those blissful sessions, let’s talk about the not-so-fun part: the installation. I’ve seen plenty of homeowners jump in with both feet only to find themselves knee-deep in problems that could’ve been avoided with a little planning.
The path to sauna nirvana isn’t always smooth, especially when you’re dealing with a project that combines electrical work, moisture management, and structural considerations. Getting these details right isn’t just about comfort—it’s about creating a safe, long-lasting retreat that actually delivers the health benefits you’re after.
Here’s what we’ll cover to help you avoid the most common pre-installation pitfalls:
- The critical planning steps most homeowners rush through (and why they shouldn’t)
- Technical requirements that can make or break your sauna experience
- How to navigate permits and regulations without pulling your hair out
Table of Contents
Show
Quick Takeaways: Home Sauna Installation Mistakes to Avoid
- Measure meticulously before purchasing – a comfortable sauna needs at least 5×7 feet for two people, with 7-foot ceilings being ideal for proper heat distribution
- Check your electrical capacity early – traditional saunas require dedicated 220-240V/30-60A circuits while infrared models often work with standard 110-120V outlets
- Never skip the vapor barrier – improper moisture control can lead to mold, rot, and structural damage in surrounding walls and floors
- Install proper ventilation with intake vents near the floor by the heater and exhaust vents on the opposite wall near the ceiling
- Choose appropriate flooring that can handle heat and moisture – concrete, tile, or vinyl work well; avoid carpet and standard hardwood
- Verify structural support can handle 500-1000+ pounds for traditional saunas or 300-600 pounds for infrared models
- Check local permits and regulations before starting – most installations require electrical permits at minimum, and HOAs may have additional restrictions
- Plan ventilation carefully – proper airflow is essential for heater function, comfort, and preventing excessive moisture buildup
- Use only heat-resistant materials designed specifically for sauna environments – standard building materials may degrade or create safety hazards
Consider professional installation for electrical work, custom carpentry, and foundation preparation to ensure safety and longevity
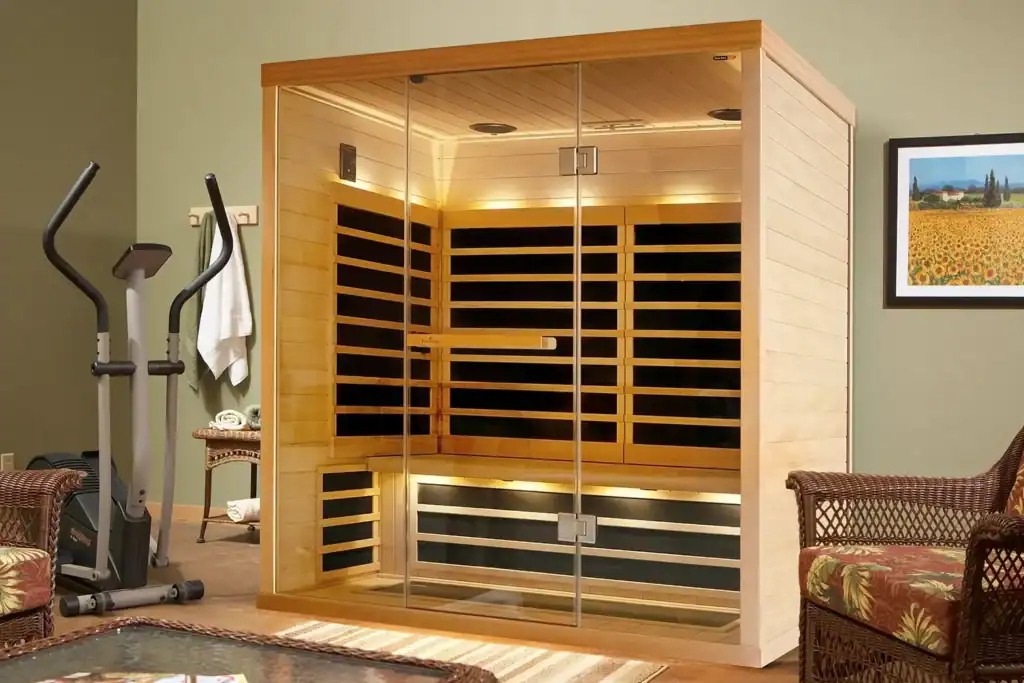
Understanding Your Sauna Options Before Breaking Ground
Before you even think about grabbing a hammer or calling a contractor, take a step back. The sauna market offers more choices than you might realize, and picking the wrong type for your situation is like buying hiking boots for a swimming competition—technically useful, but not for what you need.
Traditional vs. Infrared Saunas: Making the Right Choice
Traditional Finnish saunas and infrared models aren’t just different in how they look—they fundamentally change your installation requirements.
Traditional saunas, like the beautiful cedar models from Finnleo, use a heater to warm the air around you, typically reaching temperatures between 170-190°F. They create that classic sauna experience where you can pour water over hot rocks for a blast of steam. But here’s the catch: they typically need dedicated 240V electrical circuits, proper ventilation for the heat and occasional humidity, and structural considerations for the weight of the heater and rocks.
Infrared saunas, on the other hand, directly heat your body without significantly warming the air. They operate at lower temperatures (120-140°F), often plug into standard household outlets, and don’t produce steam. This means less intensive ventilation requirements and potentially simpler installation.
“I thought all saunas were pretty much the same until I had to rip out my newly installed traditional sauna because my electrical panel couldn’t handle the load,” shares Mark, a customer from Charlotte who learned this lesson the hard way.
Mistake #1: Inaccurate Room Measurements and Inadequate Space Planning
You know what they say about measuring twice and cutting once? With saunas, you might want to measure three times, because mistakes here can be costly and frustrating.
Critical Dimensions for Comfort and Functionality
A sauna isn’t just about squeezing in a bench and a heater. The space needs to accommodate comfortable seating, proper clearances around the heater (for safety!), and enough room to actually move around.
Most manufacturers recommend a minimum of 4×4 feet for a small one-person sauna, but realistically, you’ll want at least 5×7 feet for a comfortable experience for two people. Remember that bench depth matters too—16-24 inches is standard, but if you want to lie down (and trust me, you will), you’ll need at least 6 feet of bench length.
Here’s a simple table to guide your space planning:
| Sauna Capacity | Minimum Floor Area | Recommended Bench Length | Ideal Ceiling Height |
| 1-2 people | 4×5 feet | 4-5 feet | 7 feet |
| 3-4 people | 6×7 feet | 6-7 feet | 7 feet |
| 5-6 people | 8×10 feet | 7-8 feet | 7-8 feet |
“We thought we could fit our sauna in a 3×5 foot corner of our basement,” admits Jennifer from Raleigh. “Two thousand dollars later, we realized we either needed more space or fewer friends to enjoy it with!”
Ceiling Height Considerations and Why They Matter
Here’s something many first-timers miss: ceiling height makes a huge difference in sauna performance. Heat rises, so a ceiling that’s too high means all that warmth floats above your head rather than enveloping you in that delicious heat.
Most sauna experts recommend a 7-foot ceiling height as the sweet spot. Go higher, and your sauna will take longer to heat and use more energy. Too low, and you’ll feel cramped (not to mention the risk of bumping your head).
If you’re dealing with an existing space with higher ceilings, consider building a dropped ceiling for your sauna area. Your comfort and your energy bill will thank you.
Mistake #2: Neglecting Proper Structural Support and Foundation Requirements
Let me tell you a quick story. A customer called me panicking because their newly installed sauna was causing their floor to creak and bow. Turns out, they installed it directly on standard residential flooring without considering the weight. Sauna heaters, benches, rocks, and the structure itself add up quickly, and need to be considered in the installation process.
Weight Considerations for Different Sauna Types
A traditional sauna with rocks and a heater can easily weigh 500-1000 pounds before you even step inside. Add a couple of people, and you’re looking at significant weight concentrated in a relatively small footprint.
Infrared saunas typically weigh less without the rocks and heavy heaters, but they’re still substantial structures—usually 300-600 pounds empty.
When planning your installation, remember:
- Wood-framed floors may need additional support beams or reinforcement
- Second-story installations require careful structural assessment
- Even concrete slabs should be checked for cracks or weakness before installation
Foundation Requirements for Indoor vs. Outdoor Installations
Indoor saunas can often be installed on existing floors with proper preparation. Concrete, tile, and vinyl are ideal surfaces. Carpet is an absolute no-go—not just for structural reasons but for fire safety as well.
For outdoor saunas, on the other hand, you’ll need a proper foundation that:
- Provides a level surface (critical for proper door operation and wall alignment)
- Offers adequate drainage to prevent water pooling underneath
- Resists ground moisture that could damage the structure over time
- Can handle freeze-thaw cycles if you’re in an area with cold winters
A concrete pad is often the best solution for outdoor saunas, with proper footings that extend below the frost line in colder regions. Some prefabricated outdoor saunas can be placed on well-prepared gravel beds, but check manufacturer specifications carefully.
Mistake #3: Improper Electrical Planning and Installation
I can’t stress this enough: electrical mistakes with saunas aren’t just inconvenient—they can be dangerous. Water, heat, and electricity create a combination that demands proper planning and professional installation.
Understanding Voltage, Amperage, and Circuit Requirements
When preparing to install your sauna, keep the following in mind:
Traditional saunas typically require:
- 220-240V electrical service
- 30-60 amp dedicated circuit (depending on heater size)
- Hardwired connection (not plugged into an outlet)
- Ground fault circuit interrupter (GFCI) protection
Infrared saunas are generally less demanding, often running on:
- Standard 110-120V household current
- 15-20 amp circuit (often can use existing outlets)
- Simple plug-in operation in many cases
Before purchasing any sauna, check your home’s electrical panel to ensure it can handle the additional load. Older homes especially may need electrical service upgrades, which can add significantly to your project budget.
“When I installed my Finnleo traditional sauna, I discovered my 1970s electrical panel was already at capacity,” says Robert from Asheville. “Adding the necessary circuit meant upgrading my entire electrical service—a $2,500 expense I hadn’t planned for.”
Common Electrical Safety Hazards to Avoid
Beyond the basics of proper circuits and wiring, be aware of these critical safety considerations:
- Keep all controls and outlets outside the sauna room itself
- Use only heat-resistant wiring designed for high-temperature environments
- Ensure all electrical components are UL or ETL listed for sauna use
- Never route wiring behind insulation where it can overheat
- Install the heater according to manufacturer clearance requirements
- Consider hiring a licensed electrician familiar with sauna installations
This is definitely not the place to cut corners or DIY if you’re not qualified. The cost of professional electrical installation is minor compared to the risks of fire or electrical shock from improper work.
Mistake #4: Insufficient Ventilation Design
Proper airflow in a sauna isn’t just about comfort—it’s essential for heater operation, wood longevity, and your health.
The Science Behind Proper Sauna Airflow
Proper airflow is essential to creating a safe, comfortable, and effective sauna experience. A steady supply of fresh air provides the oxygen needed for bathers—after all, you still need to breathe even while relaxing.
Ventilation also helps remove carbon dioxide and excess humidity, which can build up quickly in an enclosed, heated space. For those using wood-burning heaters, airflow is especially important to ensure proper combustion and prevent the buildup of harmful gases.
Additionally, good circulation supports even temperature stratification throughout the sauna, allowing for consistent heat distribution.
Most importantly, ventilation prevents excessive moisture from collecting inside the structure, which could otherwise lead to mold growth and long-term damage to the wood. Without adequate airflow, a sauna can quickly become stuffy, inefficient at heating, and vulnerable to structural issues over time.
Placement of Intake and Exhaust Vents for Optimal Performance
The most effective ventilation system follows these principles:
- Supply (intake) vent should be low in the wall, typically near the floor and close to the heater
- Exhaust vent should be high on the opposite wall, usually about 6 inches below the ceiling
- For wood-burning saunas, additional combustion air intake may be required
- Vents should be adjustable to control airflow as needed
For most home saunas, passive ventilation (without fans) works well if properly designed. The natural convection of hot air rising creates the necessary airflow pattern.
Some installers make the mistake of putting both vents high or both low, which doesn’t create the necessary circulation pattern. Others omit vents entirely, thinking the door provides enough air exchange—it doesn’t!
Mistake #5: Choosing Inappropriate Flooring Materials
When it comes to sauna flooring, not all materials are created equal. The perfect sauna floor needs to handle moisture, heat, cleaning chemicals, and barefoot comfort simultaneously.
Waterproof Flooring Options That Work Well with Heat
Your sauna floor will deal with sweat, occasional water splashes (especially in traditional saunas), and cleaning solutions. Materials that work well include:
- Concrete (sealed properly)
- Ceramic or porcelain tile
- Vinyl flooring designed for wet areas
- Specialized sauna floor tiles (often plastic or wood composite)
What doesn’t work? Carpet (fire hazard and mold magnet), standard hardwood (warping issues), and laminate flooring (tends to degrade with moisture).
For added comfort, many sauna enthusiasts use removable wood duck boards or floor mats that allow moisture to drain underneath while providing a warm, comfortable surface for bare feet.
Drainage Solutions for Different Sauna Types
For traditional saunas where water is used to create steam, proper drainage in the floor is essential. Options include:
- Slightly sloped floor directing water to a drain
- Central floor drain (connects to household plumbing)
- Perimeter drainage channels
- Duck board systems that allow water to evaporate from beneath
Infrared saunas generally don’t require drainage systems since they produce minimal moisture, but some form of moisture management is still advisable for cleaning and sweat.
“I installed my sauna with beautiful stone tile flooring but forgot about the slope,” shares Michael from Charlotte. “Now water pools in one corner after every use, and I’m constantly worried about mold growing underneath.”
Mistake #6: Skipping or Improperly Installing Moisture Barriers
Here’s a truth that might surprise you: the worst enemy of your sauna isn’t heat—it’s moisture migrating into your home’s structure. Without proper moisture barriers, your beautiful new sauna could eventually cause rot, mold, and structural damage to your home.
Why Vapor Barriers Are Non-Negotiable
Despite their name, saunas aren’t actually designed to be wet inside the walls or under the floor. The heat creates a significant vapor pressure that tries to push moisture into cooler surrounding areas—like your home’s walls, ceiling, or floor.
A properly installed vapor barrier prevents this moisture migration by creating an impermeable boundary between the hot, occasionally humid sauna environment and your home’s structure.
Even infrared saunas, which operate at lower temperatures and humidity, require vapor protection because they still generate significant heat differentials that can drive moisture movement.
Proper Installation Techniques for Effective Moisture Control
For effective moisture control:
- Install a continuous 6-mil (or heavier) polyethylene vapor barrier on the exterior side of the sauna insulation (between insulation and wall framing)
- Overlap seams by at least 4-6 inches
- Seal all seams with foil or vapor barrier tape specifically designed for this purpose
- Ensure the barrier is continuous across walls, ceiling, and if applicable, floor
- Carefully seal around any penetrations (light fixtures, vents, etc.)
The most common mistake is treating the vapor barrier like it’s optional or installing it with gaps and unsealed seams. Remember, water vapor is extremely persistent—it will find any weakness in your barrier system.
“We had a beautiful custom sauna built by someone who didn’t understand vapor barriers,” says Lisa from Durham. “Two years later, we discovered extensive mold in the adjacent wall. The entire sauna had to be removed to remediate the damage.”
Mistake #7: Overlooking Local Building Codes and Permit Requirements
Nothing brings a sauna project to a screeching halt faster than a visit from the building inspector after you’ve already started work. Local regulations regarding home saunas vary widely, and it’s your responsibility to know and follow them.
Understanding When Permits Are Required
Generally, permits may be required for:
- Electrical work (almost always required for 240V installations)
- Structural modifications to your home
- Plumbing additions (if you’re installing drains)
- New construction (for outdoor saunas)
- Gas line work (for gas-heated saunas)
Some jurisdictions exempt small prefabricated saunas that simply plug into existing outlets, while others require permits for any sauna installation. The only way to know for sure is to check with your local building department.
Navigating Zoning Restrictions and HOA Regulations
Beyond building codes, be aware of:
- Zoning ordinances that might restrict outdoor sauna placement
- Setback requirements from property lines
- Height restrictions for outdoor structures
- Homeowners Association (HOA) rules that may prohibit or restrict saunas
- Covenants on historic properties
For outdoor saunas, a quick call to your local zoning department and a review of any HOA documents can save you significant headaches. For indoor installations, focusing on building and electrical permits is usually sufficient.
“I built a gorgeous barrel sauna in my backyard, only to receive a certified letter from my HOA demanding its removal,” remembers Thomas from Cary. “I should have checked the covenants first—they specifically prohibited ‘outbuildings’ visible from the street.”
Pre-Installation Checklist: Setting Yourself Up for Success

Let’s pull everything together into a practical pre-installation checklist to ensure you’re ready to move forward with confidence:
Essential Tools and Materials
Beyond the sauna kit itself, be prepared with:
- Moisture meter (to verify wood moisture content)
- Level (crucial for proper door alignment)
- Tape measure (for verifying dimensions and clearances)
- Vapor barrier material and appropriate tape
- Proper insulation (mineral wool or fiberglass)
- Appropriate flooring materials
- Electrical supplies specific to your installation
- Ventilation components
- Safety equipment (gloves, eye protection, etc.)
Having these materials on hand before starting can prevent delays and frustration mid-project.
Site Planning & Measurements
- Confirm hot tub dimensions and access clearance for delivery
- Ensure minimum 18” access space around all sides (for servicing)
- Plan for cover clearance and lifting mechanism
Foundation & Structural Support
- Verify surface is level and capable of supporting full weight
- For decks: Consult a contractor or engineer to confirm structural reinforcement
- Outdoor pad: Use reinforced concrete, pavers, or a gravel base per manufacturer specs
Electrical Requirements
- Confirm voltage and amperage (most require 220–240V, 50-60A)
- Hire a licensed electrician for GFCI breaker installation
- Ensure disconnect switch is within visible range and meets code
- Use weatherproof conduit and UL-listed components
Water Access & Drainage
- Verify access to a hose connection for filling
- Confirm drainage slope or drain connection to move water away from foundation
- Install floor or yard drains if required for indoor or covered areas
Ventilation & Moisture Protection (for indoor installations)
- Ensure the room has a dedicated exhaust fan or dehumidifier
- Use moisture-resistant materials and vapor barriers
- Monitor humidity with a hygrometer
Permits & Code Compliance
- Obtain required electrical and/or building permits
- Confirm local zoning laws and HOA rules (especially for outdoor installations)
- Schedule inspections as needed
Professional Help vs. DIY: When to Call in the Experts
While many homeowners successfully install prefabricated sauna kits themselves, certain aspects often benefit from professional expertise:
- Electrical work (highly recommended for safety reasons)
- Custom carpentry (for built-in saunas)
- Foundation preparation (especially for outdoor installations)
- Plumbing connections (if including shower facilities or drains)
- Permit applications and inspections
Many companies like Epic Hot Tubs offer installation services that can be well worth the investment, especially for complex installations or if you’re not confident in your DIY skills.
The Heat Is On: Your Path to Sauna Success
We’ve covered the seven critical mistakes that can derail your sauna installation before it even begins. By avoiding these pitfalls, you’re setting yourself up for years of enjoyable, problem-free sauna sessions.
Remember that proper planning isn’t just about preventing headaches—it’s about creating a safe, efficient, and genuinely therapeutic environment. A well-installed sauna becomes more than just a home improvement; it becomes a sanctuary for health and relaxation that adds value to your life and property.
Ready to take the next step? The team at Epic Hot Tubs specializes in helping North Carolina homeowners navigate the entire sauna selection and installation process. Reach out today to discuss your specific situation and needs—we’re here to help you avoid these common mistakes and create the perfect sauna experience for your home.
FAQ: Home Sauna Installation
How much does it typically cost to install a home sauna?
Home sauna installation costs vary widely based on type, size, and whether you’re going with a prefabricated kit or custom build. For a quality 2-4 person traditional sauna, expect to invest $4,000-$9,000 for the unit itself, plus $1,000-$3,000 for proper installation including electrical work. Infrared saunas typically range from $2,500-$6,000 installed. Custom-built saunas can run $10,000+ depending on materials and features.
Can I install a sauna in my bathroom?
Yes, bathrooms can work well for sauna installation if you have sufficient space (minimum 4×4 feet plus clearances). The existing ventilation and water-resistant surfaces are advantages, but you’ll still need to ensure proper electrical capacity, moisture barriers, and possibly additional ventilation. Be sure the bathroom’s existing moisture management systems can handle the added humidity from a traditional sauna.
Do I need special electrical service for a sauna?
Traditional saunas typically require a dedicated 220-240V, 30-60 amp circuit, which may necessitate electrical panel upgrades in older homes. Infrared saunas often work with standard 110-120V outlets on a dedicated 15-20 amp circuit. Always consult with a licensed electrician to evaluate your home’s electrical capacity before purchasing a sauna heater.
What’s the best wood for sauna construction?
Cedar remains the gold standard for sauna construction due to its natural resistance to moisture, pleasant aroma, low heat conductivity, and dimensional stability in high-heat environments. Hemlock and poplar are more affordable alternatives that perform well, while Nordic spruce is popular in authentic Finnish saunas. Avoid woods with high resin content like pine, which can emit unpleasant odors when heated.
How long does a typical sauna installation take?
For prefabricated sauna kits, expect 1-2 days for assembly once all preparation work (electrical, flooring, etc.) is complete. Custom-built saunas typically take 3-7 days depending on complexity. However, the entire process including planning, obtaining permits, and preparing the space can span several weeks. Proper planning before starting installation helps minimize delays during the actual construction phase.
How much would it cost to install a sauna in your home?
Installing a home sauna typically costs between $3,000-$12,000 all-in. A quality prefab kit runs $2,500-$7,000, while custom-built saunas start around $8,000. Add $800-$2,500 for professional installation and electrical work. Infrared models generally cost less than traditional Finnish saunas, and outdoor installations require additional foundation work that can add $1,000-$3,000 to your budget.
Does a home sauna need plumbing?
Most home saunas don’t require direct plumbing connections. Traditional Finnish saunas need only a bucket and ladle for creating steam, while infrared saunas need no water at all. However, drainage solutions are recommended for traditional saunas—options include a floor drain connected to your home’s plumbing, a simple slope toward an existing drain, or removable duck boards that allow moisture to evaporate. Outdoor saunas typically need only proper ground drainage beneath.
About The Author:
Richard Horvath
Hot Tub & Spa Expert
Richard has been in the hot tub & spa industry for years. As a long hot tub & swim spa owner himself, Richard has a passion for helping homeowners create their dream backyard.